有个 Vue3 + Vite 项目的首页图片较多,加载速度较慢,所以使用webp图片来优化一下页面加载速度。
1.安装依赖
处理图片相关:
npm install imagemin@8.0.1 imagemin-webp@7.0.0 cwebp-bin -D处理路径相关:
npm install globby fs-extra path 2.配置 imagemin
由于所有图片不是全在同一个文件夹下,命名也有可能会冲突,所以要把webp图片输出到对应文件夹下,新建 imagemin.js 文件:
import imagemin from 'imagemin';
import imageminWebp from 'imagemin-webp';
import path from 'path';
import fs from 'fs-extra';
import { globby } from 'globby';

(async () => {
    try {
        // 源目录和目标目录
        const SOURCE_DIR = 'src/assets/images';
        const OUTPUT_DIR = 'src/assets/webp';

        // 1. 获取所有图片文件的绝对路径
        const files = await globby([`${SOURCE_DIR}/**/*.{jpg,png}`]);

        // 2. 遍历处理每个文件
        for (const filePath of files) {
            // 计算相对路径
            const relativePath = path.relative(SOURCE_DIR, filePath);
            const outputPath = path.join(OUTPUT_DIR, path.dirname(relativePath), `${path.basename(filePath, path.extname(filePath))}.webp`);

            // 3. 创建目标目录结构
            await fs.ensureDir(path.dirname(outputPath));

            // 4. 转换并保存文件
            const [result] = await imagemin([filePath], {
                destination: path.dirname(outputPath),
                plugins: [imageminWebp({ quality: 75 })]
            });

            if (result) {
                console.log(`Converted: ${relativePath} → ${path.relative(OUTPUT_DIR, outputPath)}`);
            }
        }

        console.log('\n✅ 图片转换完成');
    } catch (error) {
        console.error('\n❌ 图片转换错误:', error);
        process.exit(1);
    }
})();
在 package.json 中添加:
"scripts": {
  "prebuild": "node imagemin.js",
  "build": "vite build"
}
然后运行:
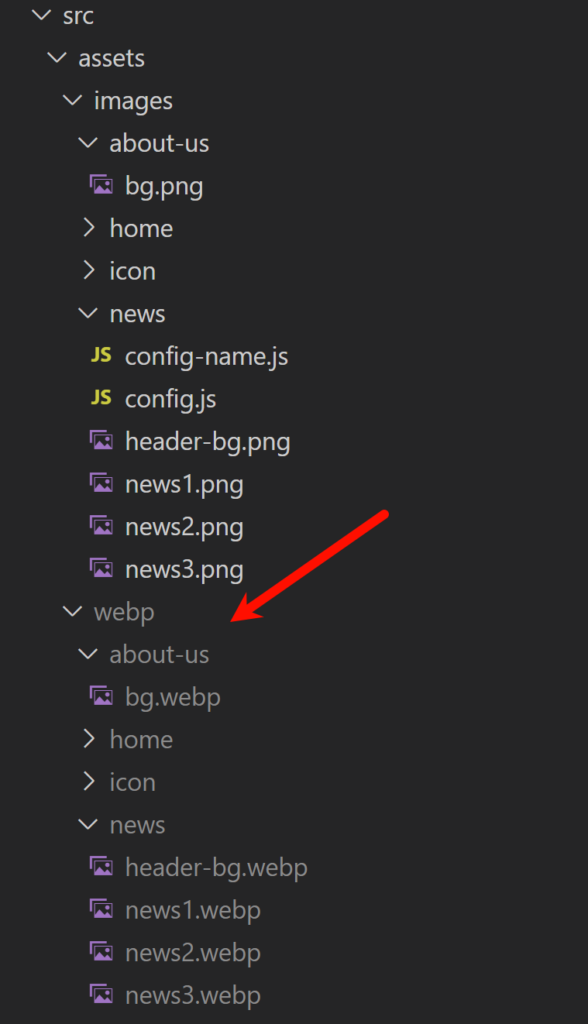
npm run prebuild可以看到生成配置目录下的所有图片的webp文件,则图片转换成功(记得在.ignore文件中添加该文件夹,不必提交至git):
3.使用webp图片
使用<picture>标签来让支持webp图片的浏览器优先加载webp图片,在不支持webp的情况下回退到jpg或png格式:
<picture>
    <source srcset="@/assets/webp/news/header-bg.webp" type="image/webp" />
    <img src="@/assets/images/news/header-bg.png" alt="" class="img" />
</picture>
4.动态引入图片
图片很多,需要使用动态引入时,可以通过添加获取图片路径方法,传入图片名称及对应类型文件夹来访问图片。图片文件夹下新增config-name.js文件,存储图片的相对路径。
src/assets/images/news/config-name.js :
const newsImages = {
    news1: 'news1.png',
    news2: 'news2.png',
    news3: 'news3.png',
    headerBg: 'header-bg.png'
};

export default newsImages;
添加公共方法,方便多个页面调用,src/utils/imagesUtils.js :
// 获取原始图片路径
export function getOriginalImage(imagePath, folder) {
    return new URL(`/src/assets/images/${folder}/${imagePath}`, import.meta.url).href;
}

// 获取WebP图片路径
export function getWebPImage(imagePath, folder) {
    return new URL(`/src/assets/webp/${folder}/${imagePath.replace(/\.(jpg|png)$/, '.webp')}`, import.meta.url).href;
}
页面中调用,news.vue :
<script setup>
import { ref } from 'vue';
import NewsImages from '@/assets/images/news/config-name.js';
import { getWebPImage, getOriginalImage } from '@/utils/imageUtils';
const list = ref([
{
id: 1,
imgUrl: 'news1'
},
{
id: 2,
imgUrl: 'news2'
},
{
id: 3,
imgUrl: 'news3'
}
]);
</script>
<template>
<div class="page">
<div class="img-box" v-for="item in list" :key="item.id">
<picture>
<source :srcset="getWebPImage(NewsImages[item.imgUrl], 'news')" type="image/webp" />
<img :src="getOriginalImage(NewsImages[item.imgUrl], 'news')" alt="" class="img" />
</picture>
</div>
</div>
</template>
<style lang="scss" scoped>
.page {
padding: 10px 20px;
background: #fff;
display: flex;
.img-box {
width: 20%;
margin-right: 10px;
.img {
width: 100%;
height: 100%;
}
}
}
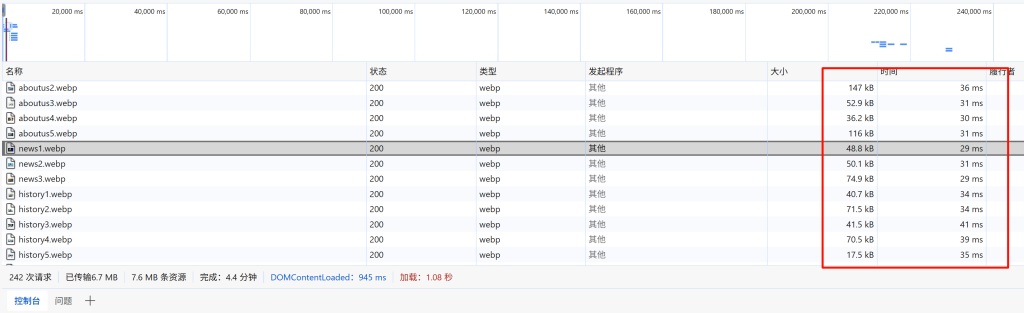
</style>谷歌浏览器中正常显示webp图片:

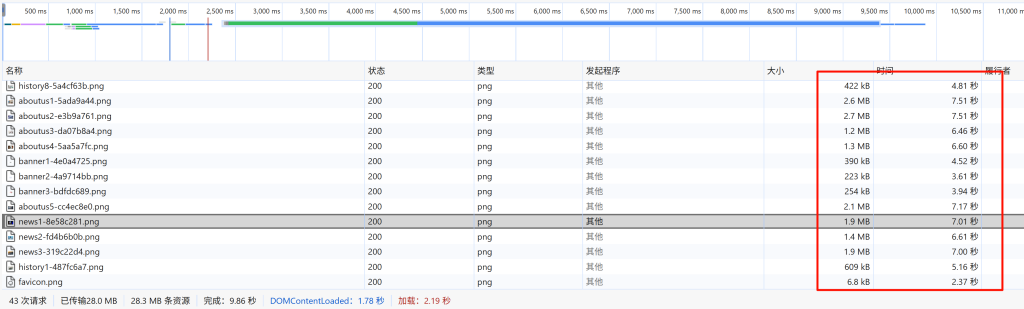
首页优化前:
使用webp图片之后,快多了~